Troubleshooting Sent Items Update
Description:
This article describes how to troubleshoot common problems that can occur when Sent Items Update is enabled.
When attempting to update sent items, you may receive one of the following warning messages in the Exclaimer event log. (Click the Status link on the right hand side of the product console to open the event log) that resembles one of the following when processing a message:
Error 1
Status: Warning
Warning: There was an error updating Sent Item for the sender
Request failed. The underlying connection was closed: Could not establish trust relationship for the SSL/TLS secure channel.
Error 2
Status: Warning
Warning: There was an error updating Sent Item for the sender
Unable to locate message with subject sent on message date and time.
Error 3
Status: Started
Warning: An invalid Exchange Web Services and/or Autodiscover SSL certificate was identified while updating the Sent Items for user senders email address. Further errors were suppressed for the specified user for 2 hours.
Error 4
Warning: There was an error updating Sent Item for the sender
The operation cannot be performed because the item is out of date. Reload the item and try again.
Error 5
Status: Warning
There was an error updating Sent Item for the sender
Request failed. The remote server returned an error: (401) Unauthorized.
Error 6
Warning: There was an error updating Sent Item for sender
Request failed. The remote server returned an error: (507) Insufficient storage
Resolution:
1. Time zone, date
and time
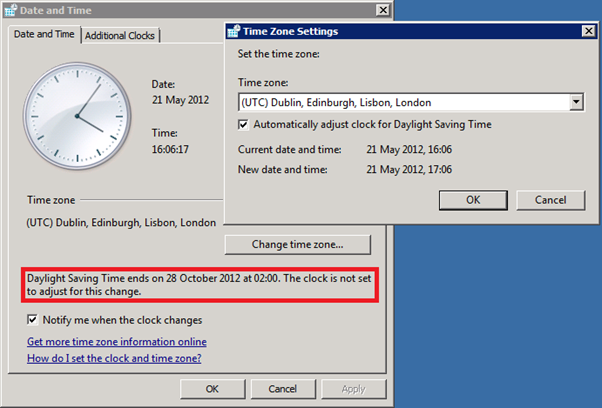
Using the Autodiscover service, Sent Items Update relies of being able to locate the message in the mailbox store by matching the message date, time and subject. If any of these are incorrect or out of date then Sent Items Update will be unable to locate the message for updating and fail with a warning after 5 minutes. Therefor it is important to ensure that the date and time as well as Day Light Savings settings are configured the same between the server and client.
Note: When making changes to Day Light Saving settings you must reboot the computer for the changes to take effect. In some cases Day Light Savings has been enabled but the status shows that the clock is not set to adjust for this change. Disabling and re-enabling Day Light Saving appears to correct this behaviour:
.
2. Outlook cached mode
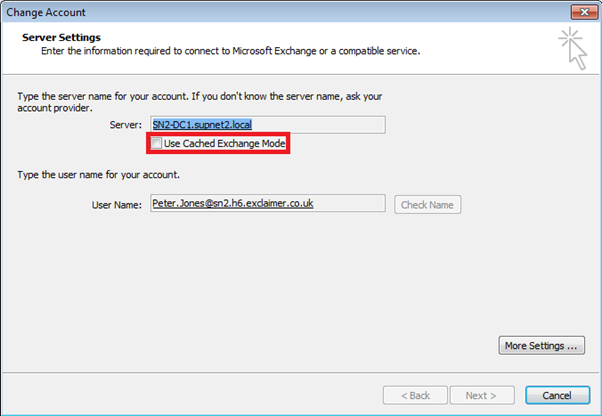
a. Sent Items Update may also be unable to locate a message if it has not yet been synchronized to the mailbox on the server from the Outlook OST file on the local machine. To ensure cached mode is not the cause of the issue, disable this feature in Outlook. You will be required to close and re-open Outlook for this change to take effect.
Note: Its not possible to configure how frequently Outlook will synchronize the OST file to the mailbox. This is dependent on availability and how busy the environment is.
b. If removing Outlook from cached mode does not resolve the problem, reduce the size of Sent Items folder in the problem users mailbox. If the folder contains a large amount of items, try moving them to a new folder. This may allow Microsoft Outlook to synchronize quicker.
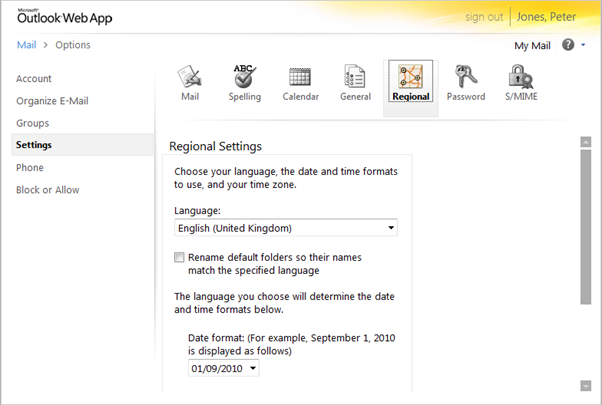
c. If messages sent from Microsoft Outlook are still not updating, identify if the problem occurs when sending a test email from Outlook Web Access. Ensure when logging on to OWA that the time zone specified in the same as the server. You can check the OWA Regional Settings using the instructions below:
· Log in to OWA.
· Click Options then See All Options.
·
Click Settings
then Regional.
Note: Messages that are sent using Send-As will not be updated by Sent Items Update. This is because Sent Items Update is searching for the message in the mailbox of the user that is being "Sent-As". This is by design. If Sent Items Update were to search all mailboxes in an environment this can take a very long time and lead to performance issue and back logs etc. This also applies to messages sent from network appliances (scanners/copiers) that send messages but don’t have an associated mailbox for sent items. Also note that certain versions of Exchange will allow you to save the sent items to both the sending user's mailbox, and the mailbox for which the email has been sent-as. Please see our KB article here.
3. Ensure that the Autodiscover URL is valid and working
In some environments Signature Manager Exchange Edition may be unable to determine the correct Autodiscover service URL because Autodiscover may not be working or configured incorrectly. Follow the steps below to obtain the Autodsicover service URL manually and to confirm if Autodiscover is working in the environment.
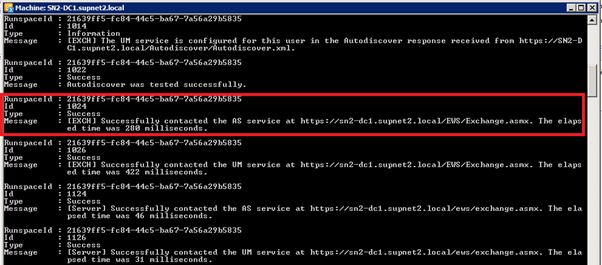
Testing Autodiscover and obtaining the Exchange URL using the Exchange Management Shell.
· Open the Exchange Management Shell and run the following command to test Autodiscover:
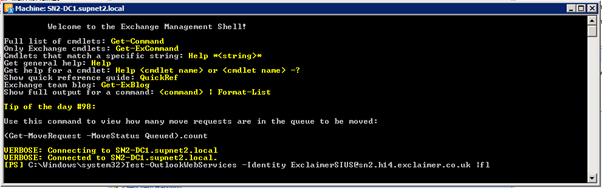
Test-OutlookWebServices –Identity ExclaimerSIUS@domian.com |fl
(Changing the email address to the valid email address of the ExclaimerSIUS account being used in the environment)
· The test results will be shown at the end

·
In the Test-OutlookWebServices results this will output the AutoDsicover URL that was being tested. Copy and paste this into the Exchange URL field on the Sent Items Update settings tab and attempt to update sent items.
If the test failed, Sent Items Update may still be able to update sent items if the correct Autodiscover URL is specified manually. (Providing Sent Items Update the Exchange URL to use rather than it trying to detect it itself). Refer to the KB article below how to configure Sent Items Update manually:
http://support.exclaimer.com/topic/620074-sent-items-update-service-manual-configuration/
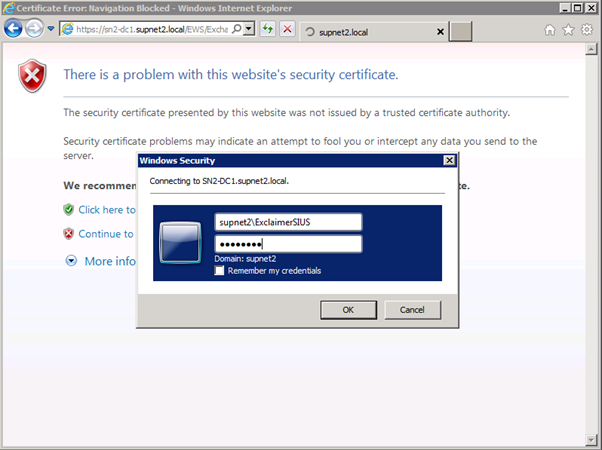
Should Signature Manager Exchange Edition still fail to update sent items then it would appear that Autodiscover has not been configured successfully in the environment or is broken. You can perform a further test by entering the Exchange URL into a web browser and trying to authenticate using the ExclaimerSIUS account.
4. Permissions
Use the PowerShell scripts in the KB article below to confirm that the permissions of the Sent Items Update account have been set correctly and are present. In some case the Sent Items Update configuration wizard may not be able to set the required permissions on the Sent Items Update user account.
Note: It’s advisable that you create a new user account specifically for Sent Items Update instead than using the default Administrator account or another service account that already exists.
Applying Application Impersonation permissions for the Sent Items Update account
5. System requirements
Ensure that Signature Manager Exchange Edition is installed on a Hub Transport server that meets the system requirements. Although Signature Manager Exchange Edition will install with Microsoft .NET Framework 2.0, to make use of Sent Items Update you will be required to install Microsoft .NET Framework 3.5 also.
What Are The System Requirements For Signature Manager Exchange Edition
6. Incorrect service credentials
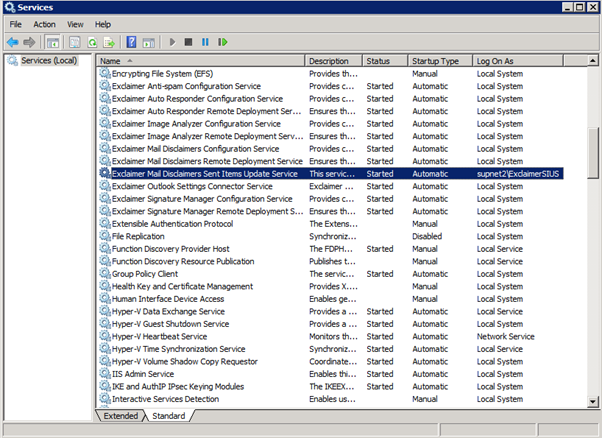
Ensure that the Exclaimer Sent Items Update Service has been configured to log on with the credentials of the service account that were specified during the Configuration wizard and that the Local System account is not being used.
If the service is configured correctly and started, then the Maximum Message Size may need to be increased in the web.config file on he Microsoft Exchange Client Access Server. The default is 35000KB.
1. On the Client Access server, navigate to \Program Files\Microsoft\Exchange Server\ClientAccess\exchweb\ews\
2. Take a copy of the web.config file for backup purposes
3. Open the web.config file using Notepad
4. Locate the line:
<httpRuntime maxRequestLength="35000" />
5. Increase the value of httpRuntime maxRequestLength specifying the size in KB
6. Save the changes and re-test
More information about increasing the Maximum Message Size can be found in the TechNet article below:
https://technet.microsoft.com/en-us/library/aa996835.aspx
Customer support service by UserEcho