Sent Items update and remote deployment
You have a two Exchange server DAG environment with Signature Manager Exchange Edition. However, the second node is not syncing the configuration from the first.
There are some steps you can take to rectify this:
There are some steps you can take to rectify this:
- Go to your Remote Deployment Share.
- Delete the contents to reset it back to zero.
- Open the console on your primary server.
- Make a small change here to allow you to deploy to the second server.
- Save the console and click Yes to deploy to second server.
- Go to the second server.
- Restart the Remote Deployment Service.
- Confirm that the primary server has created a .md2 file in the Remote Deployment Share.
- Open the Exclaimer Logs on the second server by clicking Status on the right hand side of the console.
- Filter the logs to the Exclaimer Remote Deployment Service.
- Wait for event 2401.
- Open your Exclaimer console.
- Click Sent Items Update on the left hand side.
- Click the ‘Configure Sent Items Update Service’ button in the center panel.
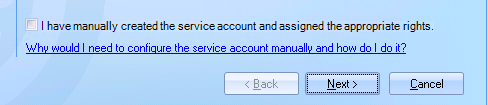
- On the first page of the Wizard, check the box marked ‘I have manually created the service account and assigned the appropriate rights’.
- Click the Start menu and click Run...
- Type Services.msc to open the services.
- Find the ‘Exclaimer Signature Manager Exchange Edition Sent Items Update Service’.
- Right click and select Properties.
- Select the ‘Log On’ tab.
- Select the ‘This Account’ option and enter your accounts details.
- Click ‘Apply’.
- Click OK.
- Start the service.
- Open the Remote Deployment folder.
- Empty the folder's contents.
- Go to the primary server.
- Open the console.
- Make a small change in the console and save the settings.
- Select ‘Yes’ to deploy this to your other servers.
- Confirm that a .md2 file has been created for this server in the Remote Deployment folder.
- Go to the second server.
- Restart the Remote Deployment service.
- Open the console and wait for the ‘Configuration has been modified by another user’ message to appear.
- Once this appears, it means that the deployment has worked.
- Close and reopen the console.
Customer support service by UserEcho